Summer is here! Having a simple tasty cocktail is important! Here is one I love. You can make it with Whisky/bourbon or Vodka! Which ever you prefer.
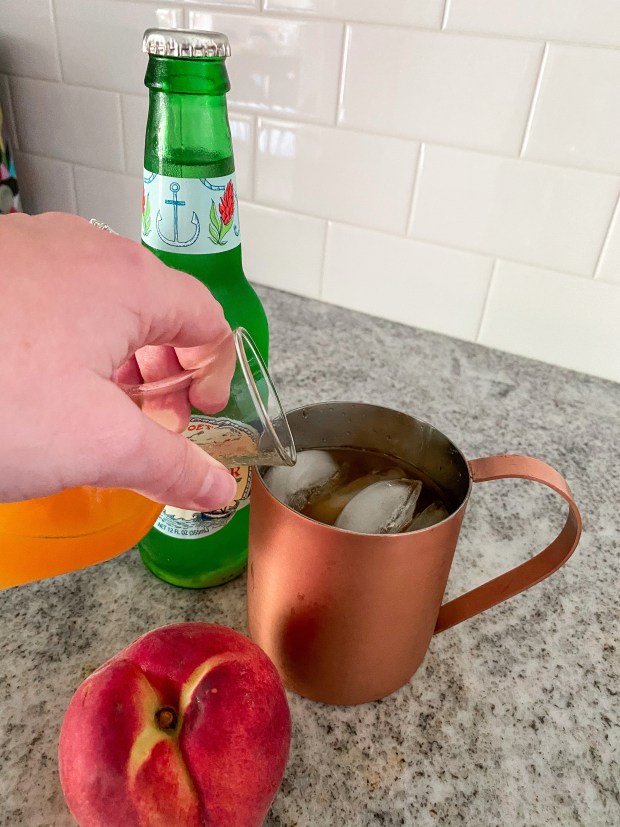
Peach Mule
Ingredients:
Whisky 1.5 oz
Peach juice 2 oz
Ginger Beer – to top off
Copper Mug
Fill your copper with ice. Add the spirit of your choice – I prefer a whiskey or bourbon. Add 2 oz peach juice. Next top off with ginger beer and give a mix. Finally garnish with a peach!
Super simple and super delicious.
I call it a Peach Mule. Or a Kentucky Peach Mule. If you use vodka you can call it a Moscow Peach mule! Or you can name it whatever you would like!
What spirit do you prefer? Tell me in the comments below! Don’t forget to pin this to Pinterest!
Our theme for the week is FRUIT! We have made a couple fun crafts. This one is simple and a BIG language activity. Did you know I am a Speech Language Pathologist too?! I like to look for activities that use a lot of different language and let Millie explore everyday objects.
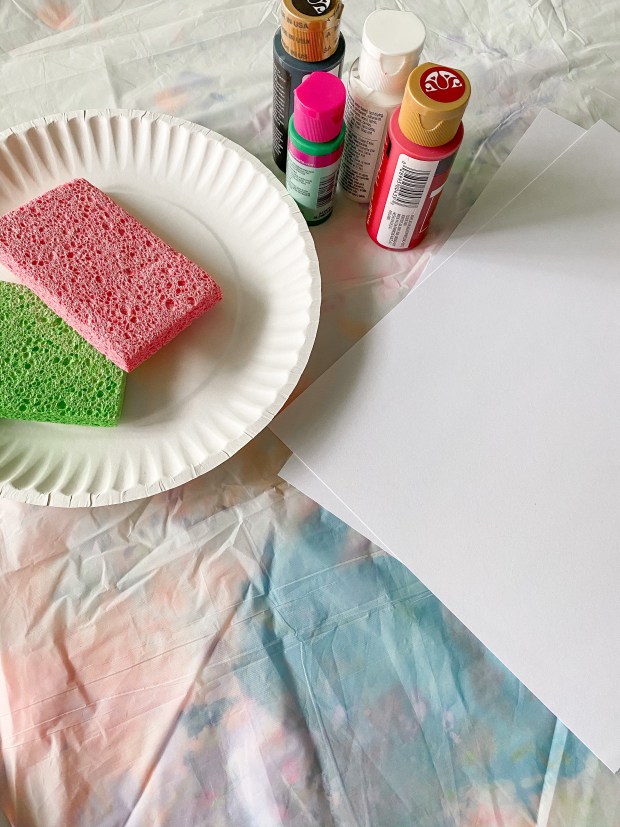
This activity is Stamping sponges on paper to make watermelons and strawberries. I bought the sponges at the Dollar store. It is a great place to find a lot of fun project items for super cheap.
For this project you will need::
Sponges- you cut out a triangle and a strawberry shape
Paint- red, black, green
Paper or Cardstock
Paper plate- to put the paint on
What you needCut the sponges into a triangle and a strawberry shape These are my shapes!
Place the sponge in the paint and place on the paper. Millie put a lot of strawberries on her paper! She was loving the stamping. After take green paint and finger print the stems for the strawberries. While we do the fingerprinting we count how many we are doing. After take your pinky and do black dots on the strawberries for the seeds! We talk about how the paint feels cool and squishy, the sponge is soft, and we use a lot of counting. Counting the strawberries, counting when we make all of the dots, etc. We also talk about colors and tried to think of other things that were red! This is a bit challenging for a two year old, but older kids would do much better! We talked about how strawberries are FRUIT and the letter of the week is F. You can talk about SO much with this activity.
We did the same thing with the watermelon. Sponge in paint, on paper, then we used our finger to finger paint the rind of the watermelon and then dots again for the seeds. With the watermelon we discussed shapes! How the water melon is round to start then this was cut into triangles. Once again we counted the black dots while we were dotting and then counted how many watermelon slices we made! We talked about how the fruit tastes too! Cold, wet, sweet, slimy, etc.
In the paintOn the paper 5 red watermelons
Looking for ways to use as much language as possible is an amazing way to teach your child more. Talking about shapes, textures, temperatures, colors, numbers, etc is great for their little brains to take in!
Make sure to Pin this to your Pinterest page for later! What is your favorite fruit?!
The theme this week was BIRDS- which is funny because I actually hate birds- like they freak me out and seem mean- but I did the theme anyway! We had a fun week learning about birds, looking at birds on our walks, out of windows, and playing pretend with birds!
This craft is simple and fun. Handprint art is always a big go to for us. The sensory aspect is fun for kids too. It is a good opportunity to discuss the feeling of the paint- cold, wet, squishy, smooth, etc.
Supplies!Squishy paint!
What you will need::
Card stock or plain white paper
Blue, teal, green, gold (other other colors of your choice)
Blue paper (ours was glitter paper)
Yellow paper
Scissors
Glue
Black Sharpie or marker
I always lay down a table cloth from the Dollar Store and a paper plate for the paint. It make the mess easier to clean up.
Place one hand in the blue paint and place on the paper then replace the hand next to the handprint. Next use the teal colored paint to do the same thing but with the other hand. After use your fingers to dot the green and the gold around.
Blue paint, teal paint, finger dots of green and gold
Take the blue paper and cut out the peacock body to the size of your handprints. I did this free hand/cutting, it is not perfect. Then use sharpie to make the eyes. I used yellow paper and cut a small heart shape for the beak. Glue that on to the peacock body. I suggest waiting a hot minute for the paint to dry before you glue the body on to the ‘feathers’. After it has dried a bit glue the body to it! Once fully dry cut out the peacock- you could leave it as is, but I think it looks cuter cut out. That is it! You have your beautiful bird!
Simple eyes Heart noseLooking so cute!Cute out the peacock! Final productMommy take my picture!!
You could use more colors, different colors, add glitter or feathers, there is a lot you could do to make it your own.
With teacher appreciation week, Mother’s Day, birthdays, and Father’s Day coming up it seems like we are in need of a card every other week! I decided we should make our own cards to give! It is a super simple craft and makes a real personal touch when sending someone a card!
All you need is paint, paintbrush (or hands), paper, and card stock. Painting Hack: I always lay down a Dollar Store table cloth so the mess is easy to clean up! I used colored construction paper to paint on. I put a few dots of different color paint on the paper then let Millie brush away. We made one with pinks and purples and one with greens a blues. You can do any colors you want! It is endless.
Once the paint dries all we did was cut out designs. I did hearts for Teacher Appreciation and Mother’s Day, and stars for our Uncle and for Father’s Day! Cut out whatever shape, Letter, or design you want and glue it onto the card stock that is folded in half like a card. I did all of ours where it opens like a book, but you could do it opening bottom to top too!
We made hearts! You can do anything you want!
After the glue dried we wrote our notes on the inside. Simple as that. Millie had a blast making it and I know her teachers and our family will love the personal touch of her art work!
Perfect for Mother’s Day, Teacher Appreciation, Father’s Day, birthdays, and more
We love doing art projects. Now that Millie isn’t going to Mother’s Day Out since quarantine I’ve been trying to do art most days even if it is watercolors on a coloring book. With Cinco de Mayo in a few days I thought this was a fun project! It is so simple but turns out so cute!
We did mommy and me handprints. You can do just their handprint, just kids, just yours, whatever you want! I thought doing a family one would be fun too!
All you need is paper- card stock is better but not necessary – green paint, a color for the flowers paint, and a Sharpie! That is it!
Start by putting some paint on a paper plate – easy clean up. Press your hand into the paint and place it gently on the paper. If you have a smaller child they will need a lot of help with this!
Next use fingers to make the extra green marks on the cactus. Then pick a flower color and use your fingerprints to make flowers using 3 dots.
You will need to let it dry. Once it is dry use your sharpie and make some cactus needles! Simple as that!
Supplies:
Paper
Green Paint
Purple, Pink, Yellow, or blue paint
Black Sharpie
SuppliesPut paint on paper plate and press your hand into it Make sure you spread the paint all overFull disclosure- we had to do this twice because the first time she smacked her hand down over and over on the paper! Use fingers to add the green knobs and the flowers on the cactus— then let dry Once it is dry add the needles with black sharpie and you’re done!